> ## Documentation Index
> Fetch the complete documentation index at: https://elastly.io/docs/llms.txt
> Use this file to discover all available pages before exploring further.
# Connecting NetSuite
> Connect NetSuite with an OAuth 2.0 machine-to-machine integration and sync your catalog, costs, customers, quotes, and realized sales orders.
Elastly reads your catalog, costs, inventory, customers, quotes, and realized sales orders from
NetSuite over SuiteTalk REST. Because the sync runs unattended on a schedule, it uses NetSuite's OAuth
2.0 Client Credentials (machine-to-machine) grant: there's no browser redirect and no end-user
authorize step. Authentication is by certificate, and Elastly generates the key pair for you, so you
only download a public certificate and upload it to NetSuite.
Setup is done once by a NetSuite administrator and takes about ten minutes.
## What you'll need
**NetSuite administrator access**, to enable features, create an integration record, set up a role,
and upload the certificate.
## Enable the required features
Go to **Setup → Company → Enable Features → SuiteCloud**. Enable **Client SuiteScript**, **Server
SuiteScript**, **REST Web Services**, and **OAuth 2.0**, accept the SuiteCloud terms, then save.
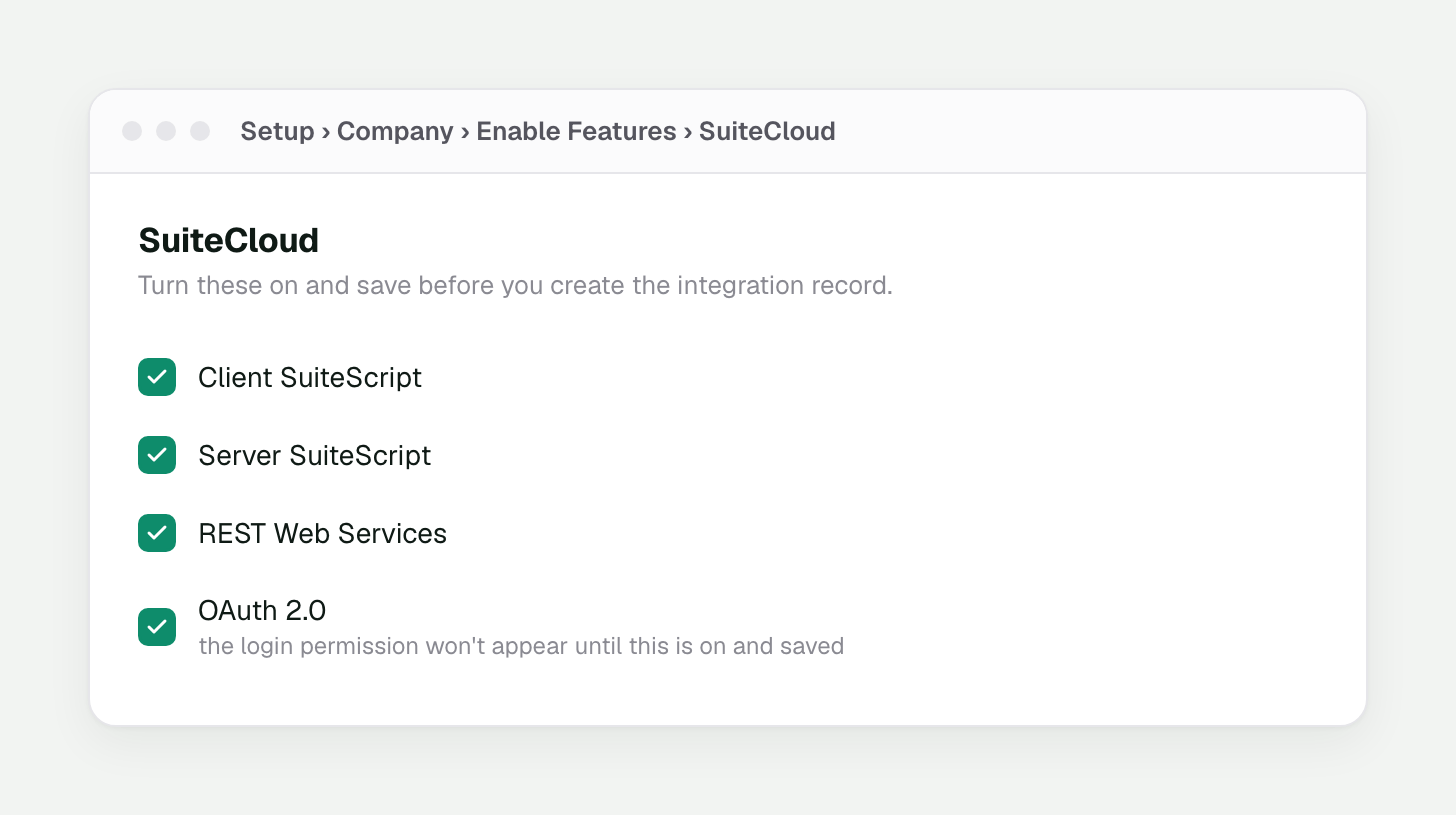 **Do this first.** The OAuth 2.0 login permission you'll add to the role in a later step does
**not** appear in the permissions list until **OAuth 2.0** is enabled here and saved. If you can't
find that permission, this is almost always why.
## Create the integration record
Go to **Setup → Integration → Manage Integrations → New**. Name it (for example "Elastly"), set
**State** to *Enabled*, then check the following:
* **Client Credentials (Machine to Machine) Grant**: required for M2M
* **REST Web Services**: required for SuiteTalk REST
* Leave **Authorization Code Grant** unchecked
Save. NetSuite shows a **Client ID**; copy it now.
**Do this first.** The OAuth 2.0 login permission you'll add to the role in a later step does
**not** appear in the permissions list until **OAuth 2.0** is enabled here and saved. If you can't
find that permission, this is almost always why.
## Create the integration record
Go to **Setup → Integration → Manage Integrations → New**. Name it (for example "Elastly"), set
**State** to *Enabled*, then check the following:
* **Client Credentials (Machine to Machine) Grant**: required for M2M
* **REST Web Services**: required for SuiteTalk REST
* Leave **Authorization Code Grant** unchecked
Save. NetSuite shows a **Client ID**; copy it now.
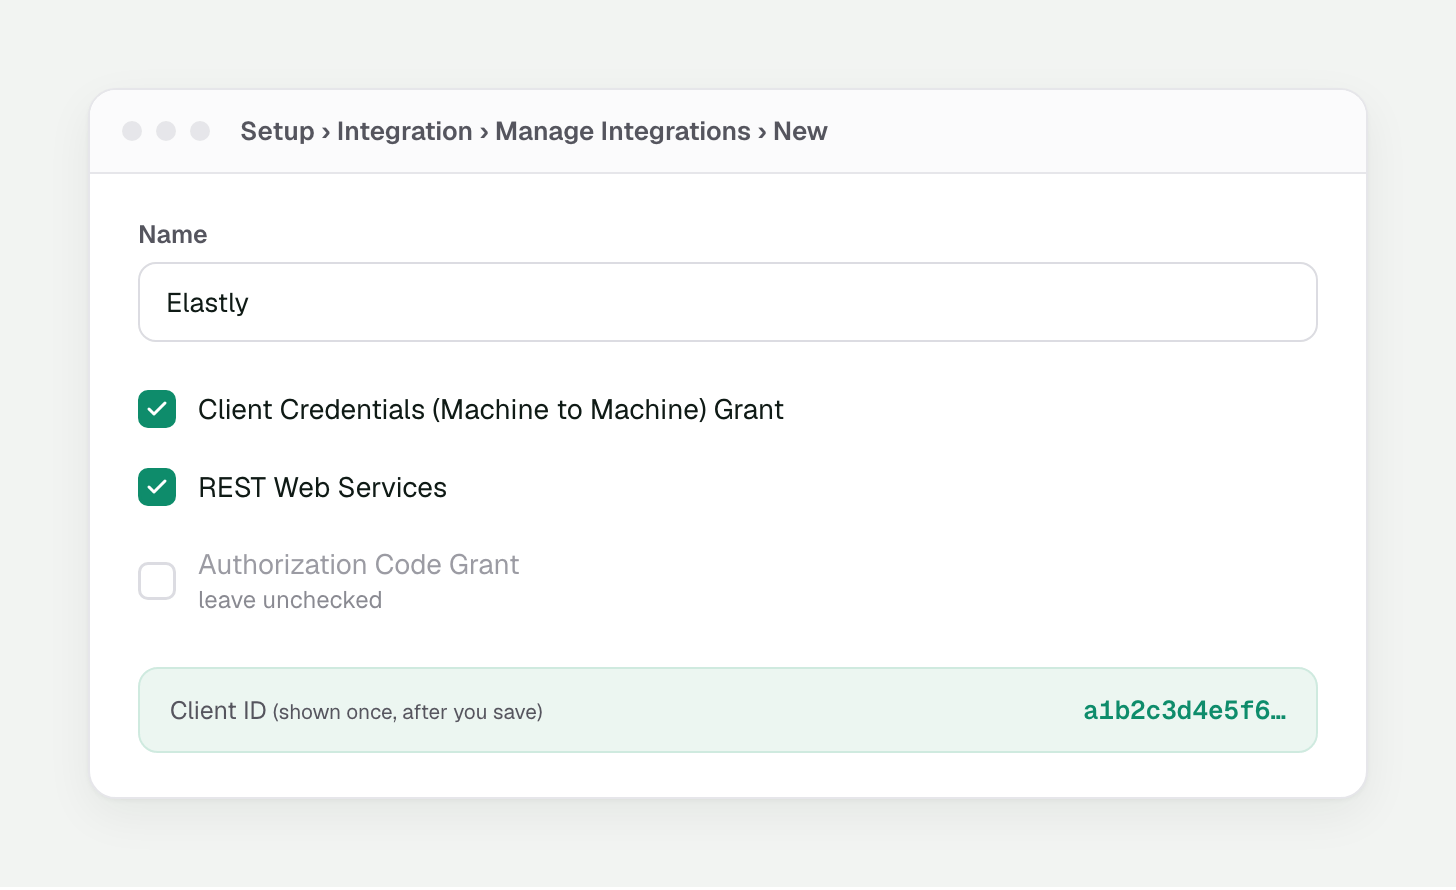 M2M has no client secret. Authentication is done with a certificate, which you'll add in the steps
below.
## Create a role for the integration
A **role** in NetSuite is a named bundle of permissions you attach to a user, and it decides what
that login is allowed to read. Elastly logs in as a user, and that user's role determines what Elastly
can pull.
Create a **new, dedicated role** for this. Don't reuse Administrator or another built-in role.
Built-in roles are locked, which is also why the OAuth permission won't appear when you try to add it
to them.
Go to **Setup → Users/Roles → Manage Roles → New** and name it something like `Elastly
Integration`.
On the **Permissions → Setup** sub-tab, add:
| Permission | What it's for |
| ------------------------------------ | --------------------------------------------------------------------------------------------------- |
| Log in using OAuth 2.0 Access Tokens | Only appears once OAuth 2.0 is enabled above. Not the OAuth 1.0 entry "Log in using Access Tokens". |
| REST Web Services | Without it, token requests succeed but every data call is rejected. |
| SuiteAnalytics Workbook | Required for SuiteQL queries. |
On the **Permissions → Lists** sub-tab, add **View** on:
| Permission | What it's for |
| ------------ | ----------------------------------------------------------------- |
| Items | Your catalog, costs, and inventory. |
| Customers | Who's buying. This drives per-customer and per-segment pricing. |
| Price Levels | Elastly reads the customer's price level to assign their segment. |
On the **Permissions → Transactions** sub-tab, add:
| Permission | Level | What it's for |
| ----------------- | -------------- | --------------------------------------------------------------------------- |
| Find Transaction | View | Required to retrieve any transaction over REST/SuiteQL. |
| Estimate (quotes) | View | Your quotes. Grant Edit instead if you want price write-back. |
| Sales Order | View, required | Elastly learns from realized sales, not just quotes. See the warning below. |
**Save**, then give a user this role. Open the user under **Setup → Users/Roles → Manage Users**,
edit their employee record, and on the **Access** subtab check **Give Access** and add the
`Elastly Integration` role. Elastly signs in as this user, so if the role isn't attached here the
token request fails. You'll select this same user and role in the certificate step below.
**Sales Order is required, and its omission fails silently.** Elastly's pricing learns from won,
realized Sales Orders. They're the accept signal and the last-purchase-price source. SuiteQL is
permission-sensitive: if the role can't read Sales Orders, the orders sync fails with an opaque
server error (NetSuite reports a missing permission as if the table doesn't exist), not a clear
"access denied". If orders aren't syncing, check this permission first.
If your NetSuite account is **OneWorld** (more than one subsidiary), the role and the user you
assign it to only see the subsidiaries they're granted, and Elastly syncs data only for those.
Customers, items, and orders in a subsidiary the role can't reach are skipped with no error, so the
data just looks incomplete later. On the role, grant every subsidiary you want priced (or all of
them), and confirm the assigned user has the same access. On a single-subsidiary account there's
nothing to set here.
NetSuite may label this permission "Quotation," not "Estimate." Even on an account that has never
renamed anything, the Transactions permission picker can list the Estimate record under NetSuite's
internal name, **Quotation**. If you don't see "Estimate", look for "Quotation" instead; it's the
same permission.
If you want Elastly to batch-publish approved recommendations onto your NetSuite quotes (the
**Elastly Rate** column, never the native price), grant **Edit** (not just View) on **Estimate**.
Sales Order stays **View**, since write-back only ever updates Estimate lines. View-only on both is
enough for read-only pricing intelligence.
## Generate the certificate in Elastly
In Elastly, open **Integrations → Connect → Oracle NetSuite** and click **Generate & Download**.
Elastly creates the key pair and downloads a public certificate file, `elastly-netsuite.pem`. This is
a public X.509 certificate (RSA-3072), never a `.p12`. A `.p12` would contain the private key, which
always stays inside Elastly.
The private key never leaves Elastly. You only ever download and share the public certificate file.
## Upload the certificate in NetSuite
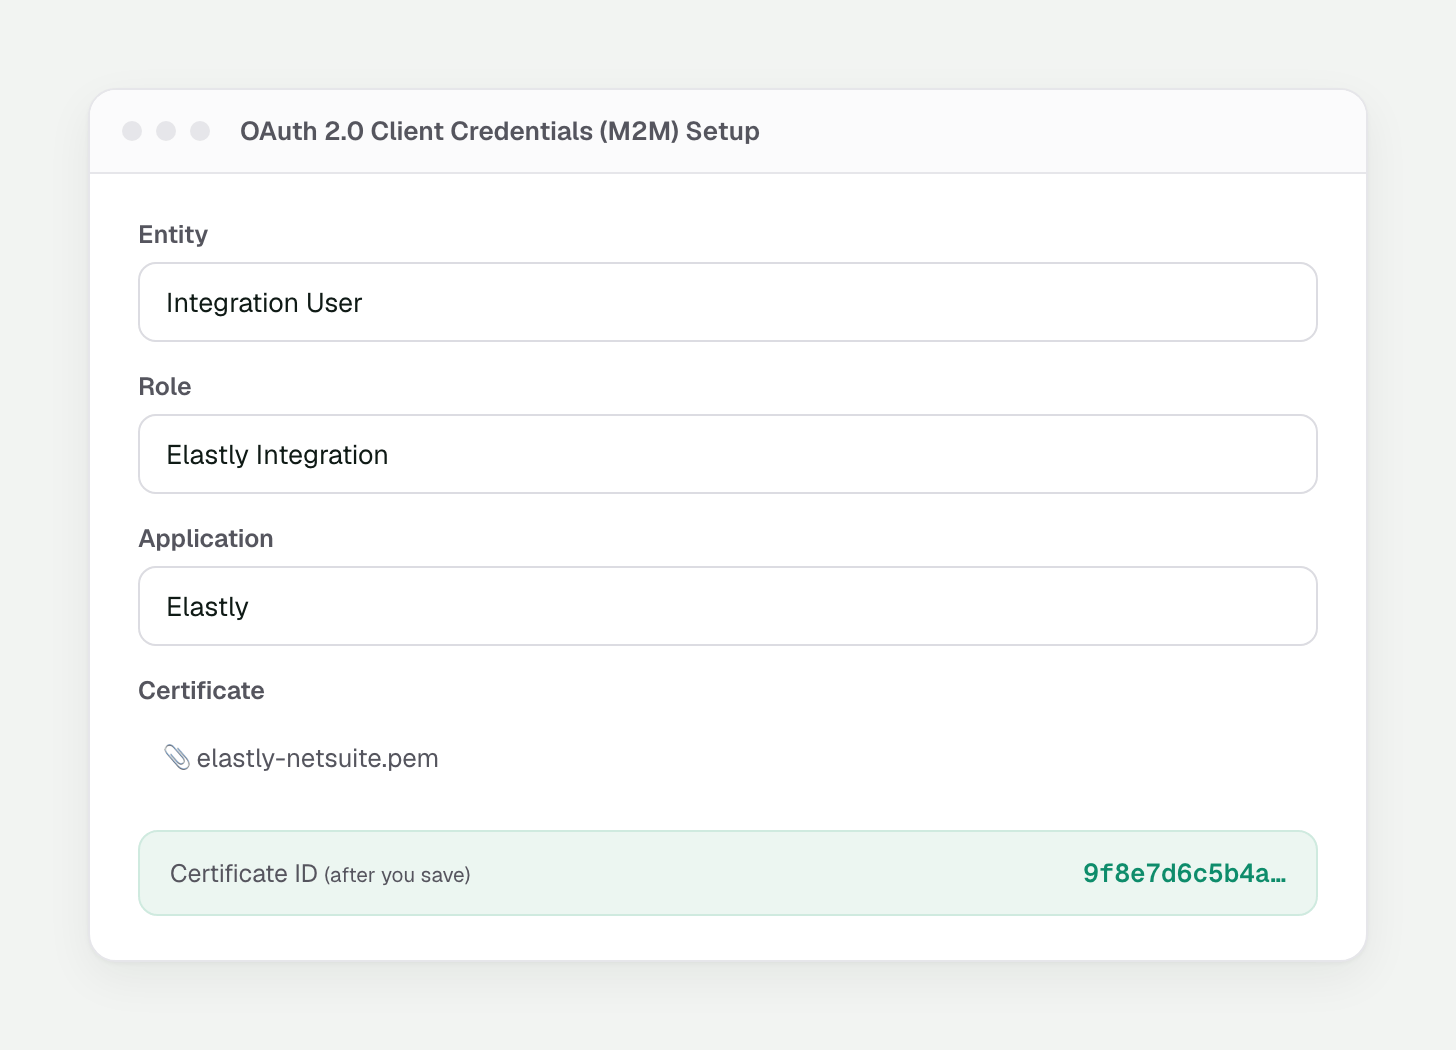
Go to **Setup → Integration → Manage Authentication → OAuth 2.0 Client Credentials (M2M) Setup** and
click **Create New**. (The administrator doing this needs the **OAuth 2.0 Authorized Applications
Management** permission; a full Administrator role already has it.) Fill in:
* **Entity**: the user the integration runs as
* **Role**: the role you configured above
* **Application**: the integration record ("Elastly")
* **Certificate**: upload `elastly-netsuite.pem`
Save. NetSuite generates a **Certificate ID**; copy it.
M2M has no client secret. Authentication is done with a certificate, which you'll add in the steps
below.
## Create a role for the integration
A **role** in NetSuite is a named bundle of permissions you attach to a user, and it decides what
that login is allowed to read. Elastly logs in as a user, and that user's role determines what Elastly
can pull.
Create a **new, dedicated role** for this. Don't reuse Administrator or another built-in role.
Built-in roles are locked, which is also why the OAuth permission won't appear when you try to add it
to them.
Go to **Setup → Users/Roles → Manage Roles → New** and name it something like `Elastly
Integration`.
On the **Permissions → Setup** sub-tab, add:
| Permission | What it's for |
| ------------------------------------ | --------------------------------------------------------------------------------------------------- |
| Log in using OAuth 2.0 Access Tokens | Only appears once OAuth 2.0 is enabled above. Not the OAuth 1.0 entry "Log in using Access Tokens". |
| REST Web Services | Without it, token requests succeed but every data call is rejected. |
| SuiteAnalytics Workbook | Required for SuiteQL queries. |
On the **Permissions → Lists** sub-tab, add **View** on:
| Permission | What it's for |
| ------------ | ----------------------------------------------------------------- |
| Items | Your catalog, costs, and inventory. |
| Customers | Who's buying. This drives per-customer and per-segment pricing. |
| Price Levels | Elastly reads the customer's price level to assign their segment. |
On the **Permissions → Transactions** sub-tab, add:
| Permission | Level | What it's for |
| ----------------- | -------------- | --------------------------------------------------------------------------- |
| Find Transaction | View | Required to retrieve any transaction over REST/SuiteQL. |
| Estimate (quotes) | View | Your quotes. Grant Edit instead if you want price write-back. |
| Sales Order | View, required | Elastly learns from realized sales, not just quotes. See the warning below. |
**Save**, then give a user this role. Open the user under **Setup → Users/Roles → Manage Users**,
edit their employee record, and on the **Access** subtab check **Give Access** and add the
`Elastly Integration` role. Elastly signs in as this user, so if the role isn't attached here the
token request fails. You'll select this same user and role in the certificate step below.
**Sales Order is required, and its omission fails silently.** Elastly's pricing learns from won,
realized Sales Orders. They're the accept signal and the last-purchase-price source. SuiteQL is
permission-sensitive: if the role can't read Sales Orders, the orders sync fails with an opaque
server error (NetSuite reports a missing permission as if the table doesn't exist), not a clear
"access denied". If orders aren't syncing, check this permission first.
If your NetSuite account is **OneWorld** (more than one subsidiary), the role and the user you
assign it to only see the subsidiaries they're granted, and Elastly syncs data only for those.
Customers, items, and orders in a subsidiary the role can't reach are skipped with no error, so the
data just looks incomplete later. On the role, grant every subsidiary you want priced (or all of
them), and confirm the assigned user has the same access. On a single-subsidiary account there's
nothing to set here.
NetSuite may label this permission "Quotation," not "Estimate." Even on an account that has never
renamed anything, the Transactions permission picker can list the Estimate record under NetSuite's
internal name, **Quotation**. If you don't see "Estimate", look for "Quotation" instead; it's the
same permission.
If you want Elastly to batch-publish approved recommendations onto your NetSuite quotes (the
**Elastly Rate** column, never the native price), grant **Edit** (not just View) on **Estimate**.
Sales Order stays **View**, since write-back only ever updates Estimate lines. View-only on both is
enough for read-only pricing intelligence.
## Generate the certificate in Elastly
In Elastly, open **Integrations → Connect → Oracle NetSuite** and click **Generate & Download**.
Elastly creates the key pair and downloads a public certificate file, `elastly-netsuite.pem`. This is
a public X.509 certificate (RSA-3072), never a `.p12`. A `.p12` would contain the private key, which
always stays inside Elastly.
The private key never leaves Elastly. You only ever download and share the public certificate file.
## Upload the certificate in NetSuite
Go to **Setup → Integration → Manage Authentication → OAuth 2.0 Client Credentials (M2M) Setup** and
click **Create New**. (The administrator doing this needs the **OAuth 2.0 Authorized Applications
Management** permission; a full Administrator role already has it.) Fill in:
* **Entity**: the user the integration runs as
* **Role**: the role you configured above
* **Application**: the integration record ("Elastly")
* **Certificate**: upload `elastly-netsuite.pem`
Save. NetSuite generates a **Certificate ID**; copy it.
 Redo this M2M certificate setup in each environment, and again after every sandbox refresh. A
sandbox and production never share a certificate.
The certificate Elastly generates is valid for two years. The sync runs normally until then, and
Elastly emails you a reminder as the expiry date approaches. To renew, open **Integrations → Oracle
NetSuite** in Elastly, generate a fresh certificate, upload it in this same M2M setup screen, and
enter the new Certificate ID. It's the same steps you're doing now.
## Find your Account ID
Your **Account ID** is under **Setup → Company → Company Information** (also the subdomain prefix of
your NetSuite URL). Production looks like `1234567`; sandbox looks like `1234567_SB1`.
## Finish in Elastly
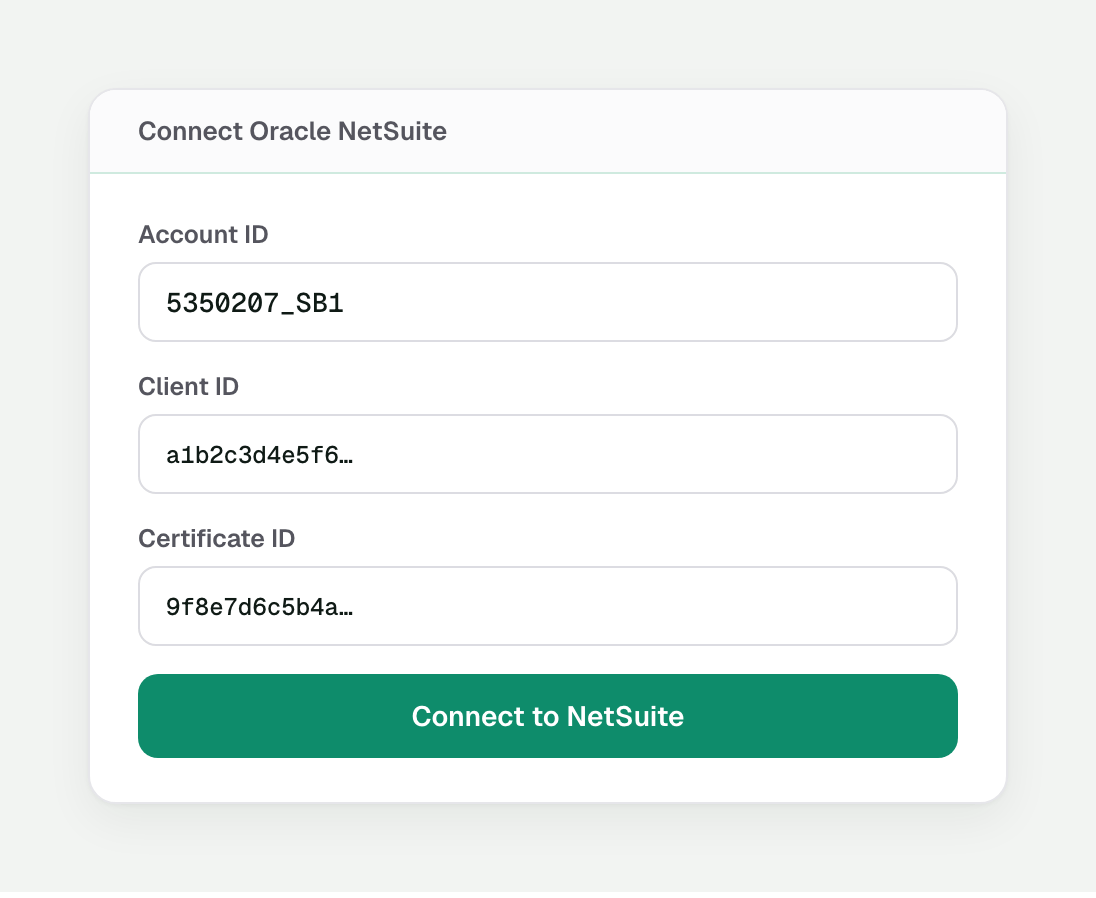
Back in the Elastly connect dialog, enter your **Account ID**, **Client ID**, and **Certificate ID**,
then click **Connect to NetSuite**. There's no redirect or authorize step: Elastly requests an access
token to verify the setup and starts your first sync.
Redo this M2M certificate setup in each environment, and again after every sandbox refresh. A
sandbox and production never share a certificate.
The certificate Elastly generates is valid for two years. The sync runs normally until then, and
Elastly emails you a reminder as the expiry date approaches. To renew, open **Integrations → Oracle
NetSuite** in Elastly, generate a fresh certificate, upload it in this same M2M setup screen, and
enter the new Certificate ID. It's the same steps you're doing now.
## Find your Account ID
Your **Account ID** is under **Setup → Company → Company Information** (also the subdomain prefix of
your NetSuite URL). Production looks like `1234567`; sandbox looks like `1234567_SB1`.
## Finish in Elastly
Back in the Elastly connect dialog, enter your **Account ID**, **Client ID**, and **Certificate ID**,
then click **Connect to NetSuite**. There's no redirect or authorize step: Elastly requests an access
token to verify the setup and starts your first sync.
 | Value | Where to find it |
| -------------- | -------------------------------------------------------- |
| Account ID | `Setup → Company → Company Information` |
| Client ID | On the integration record, right after you save it |
| Certificate ID | After you upload `elastly-netsuite.pem` in the M2M setup |
Access tokens are short-lived (60 minutes) with no refresh token; Elastly re-acquires them
automatically, so the scheduled sync keeps running unattended.
## See Elastly's price live inside NetSuite
Everything above sets up the read-only sync that feeds Elastly. The integration can also run the other
way: a small **Client Script** inside NetSuite asks Elastly for the recommended price the moment a line
is added to an Estimate or Sales Order, and shows it on the line as an advisory column (the **Elastly
Rate** and its reason) right next to the native rate. Your reps keep working entirely in NetSuite and
see Elastly's number against their own. Elastly never overwrites the rate. The rep decides. This is
optional, and it reuses everything the sync already taught Elastly: a line seen live in NetSuite
carries the same explainable price the Elastly dashboard would show.
Set it up once the first sync has finished. It fails open by design: if Elastly is ever slow or
unreachable, the advisory columns simply stay empty and quoting is never blocked.
**A note on "Estimate."** Some accounts rename the Estimate record type (commonly to "Quote" or
"Quotation") under **Setup → Company → Rename Records/Transactions**. If you don't see "Estimate" as
an option anywhere below (in the role permissions, or in the script deployment's record-type list),
look for your account's renamed label instead. It's the same underlying record, just displayed
differently. To confirm, open any such record and check the browser URL: it still reads
`.../transactions/estimate.nl?...` regardless of the display label.
### Create an Elastly API key
The script authenticates to Elastly with a secret API key. In Elastly, go to [Settings → API keys](https://app.elastly.io/settings)
and press **Create API key**, give it a recognizable name (for example `NetSuite production`), and
**copy the key when it's shown**, since it appears only once.
**Treat it like a password.** It's shown a single time. If you lose it, revoke it and create a new
one. Use **separate keys for sandbox and production** so you can rotate one without touching the
other.
### Add the Elastly line fields
Elastly shows its recommendation on the line through four **custom line fields**. Create **all four**
now, before the script, so it has somewhere to write. NetSuite has no way to import a custom field
from a file through the UI, so you create them yourself.
Go to **Customization → Lists, Records, & Fields → Transaction Line Fields → New** (labelled
"Transaction Column Fields" in some accounts, the same thing).
Set the **Label** and **Type** from the list below, and for the **ID** type the value shown,
starting with the leading underscore (for example `_elastly_rate`). NetSuite adds the prefix
`custcol` for you, with no underscore of its own, so it saves as `custcol_elastly_rate`. Drop the
leading underscore and you get `custcolelastly_rate`, which the script can't read and nothing warns
you about.
On the **Applies To** subtab check **Sale** (may show as "Sale Item"), and check **Store Value**.
Make **Elastly Rate**, **Elastly Rate Reason**, and **Elastly Decision Id** display-only, since
they're Elastly's to write. Leave **Elastly Sales Feedback** editable, so the rep can note why they
kept, raised, or lowered the price versus Elastly's rate. Elastly reads that note back to learn.
**Save**, then repeat for all four fields.
| Type this as the ID | Type | Field |
| ------------------------- | --------- | ----------------------------------------------------------------------------------------------- |
| `_elastly_rate` | Currency | **Elastly Rate.** Elastly writes the recommended price here. Display-only. |
| `_elastly_reason` | Text Area | **Elastly Rate Reason.** The short explanation behind the price. Display-only. |
| `_elastly_sales_feedback` | Text Area | **Elastly Sales Feedback.** The rep's note versus Elastly's rate, read back to learn. Editable. |
| `_elastly_decision_id` | Text | **Elastly Decision Id.** Ties the quote line back to what Elastly recommended. Display-only. |
If a column doesn't show on the Estimate/Sales Order form after you create it, add it to the line-item
grid from the form's Screen Fields customization.
### Upload the script
Go to **Customization → Scripting → Scripts → New** and upload the `elastly_estimate_pricing_cs.js`
file Elastly provides.
On the **script record** itself (not the deployment yet), confirm these fields. Get this wrong and the
script installs cleanly but silently never runs, with nothing in any log to explain why:
| Field | Required value |
| -------------------------- | ---------------------------------------- |
| **Type** | `Client Script` |
| **Field Changed Function** | Checked (must resolve to `fieldChanged`) |
| **Post Sourcing Function** | Checked (must resolve to `postSourcing`) |
Leave every other entry-point checkbox (Page Init, Save Record, Line Init, and so on) unchecked, since
the script doesn't implement them and checking them does nothing.
### Add the two script parameters
Still on the script record, add two parameters. NetSuite prepends `custscript` to the ID (no
underscore of its own), so **type the leading underscore yourself**, exactly as you did for the line
fields:
| Label | Type this as the ID | NetSuite saves it as |
| ---------------- | ------------------- | ----------------------------- |
| Elastly base URL | `_elastly_base_url` | `custscript_elastly_base_url` |
| Elastly API key | `_elastly_api_key` | `custscript_elastly_api_key` |
**The ID field is where this setup goes wrong most.** Drop the leading underscore and you get
`custscriptelastly_base_url`; type the whole prefix yourself and you get a doubled
`custscriptcustscript_elastly_base_url`. Either way the script can't read it, and nothing warns you.
The deployment shows **Released**, the audience is correct, and yet there is zero Execution Log
activity and zero calls ever reach Elastly. The script's first lines check for these parameters and
exit immediately, silently, before logging anything, if either comes back empty. If a fresh install
produces no activity anywhere, check the parameter IDs first.
Parameter *definitions* (the two rows above) live on the script record. Parameter *values* (the actual
URL and key) are set separately, per **deployment**, in the next step.
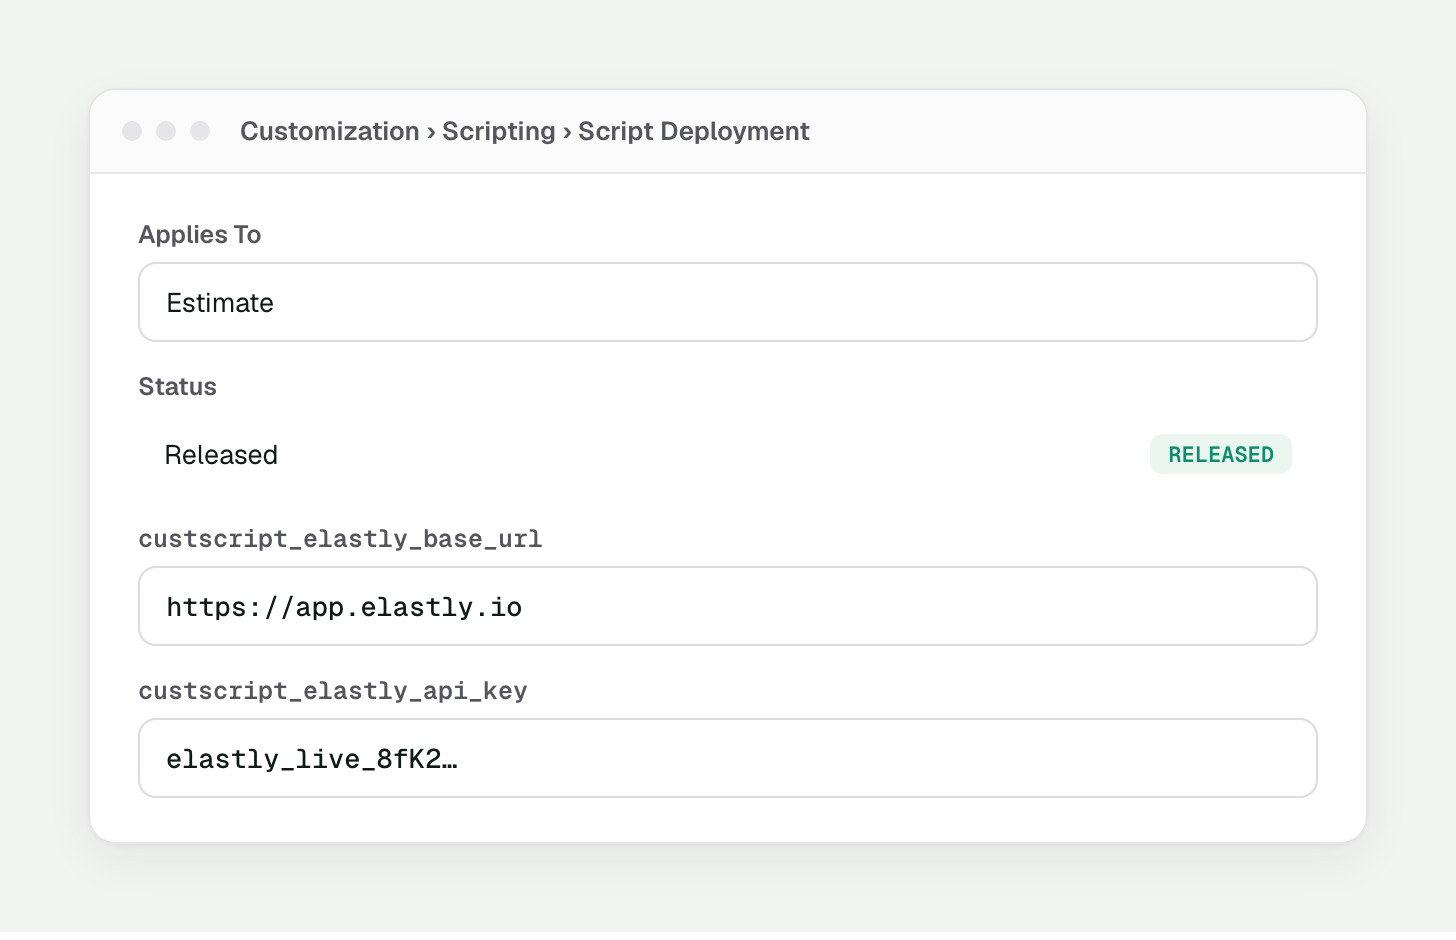
### Deploy on Estimate and Sales Order
Add a **Script Deployment** for each of Estimate and Sales Order (two separate deployment records). On
each one:
* **Status**: `Released` (not "Testing" or "Not Yet Started", since either of those means it only runs
for specifically selected test users, not your team)
* **Audience**: include every role and employee who quotes. Released status alone does not make it run
for someone outside the Audience list
* **Parameters**: fill in both values here. The base URL is `https://app.elastly.io` and the API key
is the one you copied earlier. Both fields need real values on **each** deployment record, and they
don't carry over from one deployment to the other.
| Value | Where to find it |
| -------------- | -------------------------------------------------------- |
| Account ID | `Setup → Company → Company Information` |
| Client ID | On the integration record, right after you save it |
| Certificate ID | After you upload `elastly-netsuite.pem` in the M2M setup |
Access tokens are short-lived (60 minutes) with no refresh token; Elastly re-acquires them
automatically, so the scheduled sync keeps running unattended.
## See Elastly's price live inside NetSuite
Everything above sets up the read-only sync that feeds Elastly. The integration can also run the other
way: a small **Client Script** inside NetSuite asks Elastly for the recommended price the moment a line
is added to an Estimate or Sales Order, and shows it on the line as an advisory column (the **Elastly
Rate** and its reason) right next to the native rate. Your reps keep working entirely in NetSuite and
see Elastly's number against their own. Elastly never overwrites the rate. The rep decides. This is
optional, and it reuses everything the sync already taught Elastly: a line seen live in NetSuite
carries the same explainable price the Elastly dashboard would show.
Set it up once the first sync has finished. It fails open by design: if Elastly is ever slow or
unreachable, the advisory columns simply stay empty and quoting is never blocked.
**A note on "Estimate."** Some accounts rename the Estimate record type (commonly to "Quote" or
"Quotation") under **Setup → Company → Rename Records/Transactions**. If you don't see "Estimate" as
an option anywhere below (in the role permissions, or in the script deployment's record-type list),
look for your account's renamed label instead. It's the same underlying record, just displayed
differently. To confirm, open any such record and check the browser URL: it still reads
`.../transactions/estimate.nl?...` regardless of the display label.
### Create an Elastly API key
The script authenticates to Elastly with a secret API key. In Elastly, go to [Settings → API keys](https://app.elastly.io/settings)
and press **Create API key**, give it a recognizable name (for example `NetSuite production`), and
**copy the key when it's shown**, since it appears only once.
**Treat it like a password.** It's shown a single time. If you lose it, revoke it and create a new
one. Use **separate keys for sandbox and production** so you can rotate one without touching the
other.
### Add the Elastly line fields
Elastly shows its recommendation on the line through four **custom line fields**. Create **all four**
now, before the script, so it has somewhere to write. NetSuite has no way to import a custom field
from a file through the UI, so you create them yourself.
Go to **Customization → Lists, Records, & Fields → Transaction Line Fields → New** (labelled
"Transaction Column Fields" in some accounts, the same thing).
Set the **Label** and **Type** from the list below, and for the **ID** type the value shown,
starting with the leading underscore (for example `_elastly_rate`). NetSuite adds the prefix
`custcol` for you, with no underscore of its own, so it saves as `custcol_elastly_rate`. Drop the
leading underscore and you get `custcolelastly_rate`, which the script can't read and nothing warns
you about.
On the **Applies To** subtab check **Sale** (may show as "Sale Item"), and check **Store Value**.
Make **Elastly Rate**, **Elastly Rate Reason**, and **Elastly Decision Id** display-only, since
they're Elastly's to write. Leave **Elastly Sales Feedback** editable, so the rep can note why they
kept, raised, or lowered the price versus Elastly's rate. Elastly reads that note back to learn.
**Save**, then repeat for all four fields.
| Type this as the ID | Type | Field |
| ------------------------- | --------- | ----------------------------------------------------------------------------------------------- |
| `_elastly_rate` | Currency | **Elastly Rate.** Elastly writes the recommended price here. Display-only. |
| `_elastly_reason` | Text Area | **Elastly Rate Reason.** The short explanation behind the price. Display-only. |
| `_elastly_sales_feedback` | Text Area | **Elastly Sales Feedback.** The rep's note versus Elastly's rate, read back to learn. Editable. |
| `_elastly_decision_id` | Text | **Elastly Decision Id.** Ties the quote line back to what Elastly recommended. Display-only. |
If a column doesn't show on the Estimate/Sales Order form after you create it, add it to the line-item
grid from the form's Screen Fields customization.
### Upload the script
Go to **Customization → Scripting → Scripts → New** and upload the `elastly_estimate_pricing_cs.js`
file Elastly provides.
On the **script record** itself (not the deployment yet), confirm these fields. Get this wrong and the
script installs cleanly but silently never runs, with nothing in any log to explain why:
| Field | Required value |
| -------------------------- | ---------------------------------------- |
| **Type** | `Client Script` |
| **Field Changed Function** | Checked (must resolve to `fieldChanged`) |
| **Post Sourcing Function** | Checked (must resolve to `postSourcing`) |
Leave every other entry-point checkbox (Page Init, Save Record, Line Init, and so on) unchecked, since
the script doesn't implement them and checking them does nothing.
### Add the two script parameters
Still on the script record, add two parameters. NetSuite prepends `custscript` to the ID (no
underscore of its own), so **type the leading underscore yourself**, exactly as you did for the line
fields:
| Label | Type this as the ID | NetSuite saves it as |
| ---------------- | ------------------- | ----------------------------- |
| Elastly base URL | `_elastly_base_url` | `custscript_elastly_base_url` |
| Elastly API key | `_elastly_api_key` | `custscript_elastly_api_key` |
**The ID field is where this setup goes wrong most.** Drop the leading underscore and you get
`custscriptelastly_base_url`; type the whole prefix yourself and you get a doubled
`custscriptcustscript_elastly_base_url`. Either way the script can't read it, and nothing warns you.
The deployment shows **Released**, the audience is correct, and yet there is zero Execution Log
activity and zero calls ever reach Elastly. The script's first lines check for these parameters and
exit immediately, silently, before logging anything, if either comes back empty. If a fresh install
produces no activity anywhere, check the parameter IDs first.
Parameter *definitions* (the two rows above) live on the script record. Parameter *values* (the actual
URL and key) are set separately, per **deployment**, in the next step.
### Deploy on Estimate and Sales Order
Add a **Script Deployment** for each of Estimate and Sales Order (two separate deployment records). On
each one:
* **Status**: `Released` (not "Testing" or "Not Yet Started", since either of those means it only runs
for specifically selected test users, not your team)
* **Audience**: include every role and employee who quotes. Released status alone does not make it run
for someone outside the Audience list
* **Parameters**: fill in both values here. The base URL is `https://app.elastly.io` and the API key
is the one you copied earlier. Both fields need real values on **each** deployment record, and they
don't carry over from one deployment to the other.
 **Deploy order.** Because Elastly only fills its advisory columns and never touches the line rate, it
coexists with any existing pricing script, so there's nothing to order and no cost-floor validation
to satisfy. Don't deploy it on Opportunity records, which are typically priced by a server-side
script.
### Test it
Open a new Estimate (or your account's renamed equivalent), choose a customer, and add an item: the
**Elastly Rate** column should populate with Elastly's recommendation within a moment. The native
**rate** stays exactly as NetSuite set it. Elastly only advises.
Each step rules out a specific, real failure mode, not a guess.
1. **Open the browser console (F12) before you test.** This is a *Client* Script, so it runs in the
browser. A load-time error (bad upload, corrupted file) shows up here and nowhere else. Nothing
here means the script loaded fine and the problem is further down.
2. **Check the Script Deployment's Execution Log.** An empty log plus a price never appearing means
the script's early checks are failing silently, most often the parameter IDs (see the warning
above) or parameter values left blank on *this specific* deployment.
3. **Confirm the parameter IDs are exact:** `custscript_elastly_base_url` and
`custscript_elastly_api_key` on the script record (not doubled), each with a real *value* on the
deployment you're testing.
4. **Confirm the deployment Audience includes your test user's role.** Released status doesn't matter
if the tester isn't in the Audience list.
5. **Confirm Field Changed Function and Post Sourcing Function are checked** on the script record,
matching the table above.
6. **Isolate Elastly's script from client scripts in general.** Does any *other* client script you
run still work on this record? If yes, the problem is scoped to Elastly's script. If nothing runs
at all, something account- or role-wide is blocking client scripts, a bigger issue than this
integration.
7. **Check the base URL and key.** The base URL should have no trailing slash, and the API key should
not be revoked (a revoked key returns 401, visible in the Execution Log as an error, not silence).
**Two-way: write-back.** Real-time pricing and price write-back are two separate mechanisms, and it's
worth being precise since they need different permissions. The **Client Script** above fills the
advisory columns in the form your rep already has open, under their own NetSuite session; it never
uses Elastly's integration role or REST API to write, only to read the price, so it needs no Edit
permission of its own. **Price write-back** (Elastly batch-publishing approved recommendations onto
existing Estimates from the dashboard) is the separate mechanism that needs **Edit** on Estimate (the
optional permission noted in the role step above) to fill the **Elastly Rate** column. It still never
overwrites the native rate, and only ever touches Estimates, not Sales Orders.
**Deploy order.** Because Elastly only fills its advisory columns and never touches the line rate, it
coexists with any existing pricing script, so there's nothing to order and no cost-floor validation
to satisfy. Don't deploy it on Opportunity records, which are typically priced by a server-side
script.
### Test it
Open a new Estimate (or your account's renamed equivalent), choose a customer, and add an item: the
**Elastly Rate** column should populate with Elastly's recommendation within a moment. The native
**rate** stays exactly as NetSuite set it. Elastly only advises.
Each step rules out a specific, real failure mode, not a guess.
1. **Open the browser console (F12) before you test.** This is a *Client* Script, so it runs in the
browser. A load-time error (bad upload, corrupted file) shows up here and nowhere else. Nothing
here means the script loaded fine and the problem is further down.
2. **Check the Script Deployment's Execution Log.** An empty log plus a price never appearing means
the script's early checks are failing silently, most often the parameter IDs (see the warning
above) or parameter values left blank on *this specific* deployment.
3. **Confirm the parameter IDs are exact:** `custscript_elastly_base_url` and
`custscript_elastly_api_key` on the script record (not doubled), each with a real *value* on the
deployment you're testing.
4. **Confirm the deployment Audience includes your test user's role.** Released status doesn't matter
if the tester isn't in the Audience list.
5. **Confirm Field Changed Function and Post Sourcing Function are checked** on the script record,
matching the table above.
6. **Isolate Elastly's script from client scripts in general.** Does any *other* client script you
run still work on this record? If yes, the problem is scoped to Elastly's script. If nothing runs
at all, something account- or role-wide is blocking client scripts, a bigger issue than this
integration.
7. **Check the base URL and key.** The base URL should have no trailing slash, and the API key should
not be revoked (a revoked key returns 401, visible in the Execution Log as an error, not silence).
**Two-way: write-back.** Real-time pricing and price write-back are two separate mechanisms, and it's
worth being precise since they need different permissions. The **Client Script** above fills the
advisory columns in the form your rep already has open, under their own NetSuite session; it never
uses Elastly's integration role or REST API to write, only to read the price, so it needs no Edit
permission of its own. **Price write-back** (Elastly batch-publishing approved recommendations onto
existing Estimates from the dashboard) is the separate mechanism that needs **Edit** on Estimate (the
optional permission noted in the role step above) to fill the **Elastly Rate** column. It still never
overwrites the native rate, and only ever touches Estimates, not Sales Orders.